Cast steel joints (CSJs) have broad application prospects[1-7], such as in bridge engineering, offshore oil platforms, wind turbine towers, cranes, and other engineering fields. The CSJ acts as a connecting member between steel pipes and can solve the welding problem that occurs in the intersection portion within steel tubular joints. The welded CSJ is divided into the base material part and the weld seam part, so its mechanical performances are determined by the two parts above. The mechanical properties of the welded CSJ mainly include static performance and fatigue performance. Regarding the static performance of CSJ, many research studies[8-11] have been carried out worldwide. The fatigue performance of the welded CSJ is complicated[12]. As the welding process leads to the initial defects within the weld part, the fatigue failure of welded structures is ultimately determined by the fatigue performance of the weld seam part[13-19], and the fatigue problem of the welded cast steel joint is no exception[1,20]. The results of recent experimental studies[6-7,20-21] indicate that the fatigue problem of welded cast steel joints is located at the weld seam part. Studies on the fatigue life evaluation of the welded CSJ are mainly based on the nominal stress parameter[12], for complicated welded CSJs under complex loading conditions. There is no consistent way to define the nominal stress within the welded CSJ. Therefore, the fatigue life evaluation of welded CSJs needs to be further addressed.
The effective notch stress method (ENSM) is widely applied in the fatigue life evaluation of welded structures[22]. Effective notch stress can represent the local stress state of the welded structure in fatigue life evaluation. Only one S-N curve is needed for various types of steel welded joints[22] in the fatigue life evaluation, thus avoiding the subjectivity and uncertainty of selecting different S-N curves for different welded structures under different load modes in the nominal stress method and the structural hot spot stress method. Furthermore, the effective notch stress method can be applied in the case of weld root failure, which is currently difficult to solve using the structural hot spot stress method[23].
The calculation of the effective notch stress relies entirely on numerical finite element simulations, which require creating a virtual radius of 1 mm (in the case of plate thickness greater than 5 mm) at the weld toe or the weld root and a very fine element mesh should be satisfied. Compared with the nominal stress method and the structural hot spot stress method, a fine finite element model greatly increases the mesh work of the finite element model. In this article, an extrapolation notch stress method proposed by Pradana et al.[24] is used to simplify the process of calculating the effective notch stress at the girth butt weld of welded cast steel joints, and its applicability of calculating effective notch stress at the root of welded CSJ is verified. Then, the fatigue life evaluation of the girth butt weld within welded cast steel joints is carried out according to the guideline recommended by the IIW[22].
1 The Extrapolation Notch Stress Method
The process of calculating the effective notch stress by the extrapolation notch stress method is similar to that of using the extrapolation strategy to determine the structural hot spot stress at the weld toe of the welded structure in the IIW specification[25]. In the procedure of calculating the effective notch stress by the extrapolation notch stress method, it is not necessary to establish a virtual notch radius of 1 mm at the weld toe/root combined with very fine finite element mesh, thus greatly simplifying the mesh work of finite element models, especially for welded structures with complex geometry, such as a welded CSJ. The detailed content of the extrapolation notch stress method for calculating the effective notch stress is described below, and more information about this method can be found in Refs.[24,26-27].
1.1 Basic theory
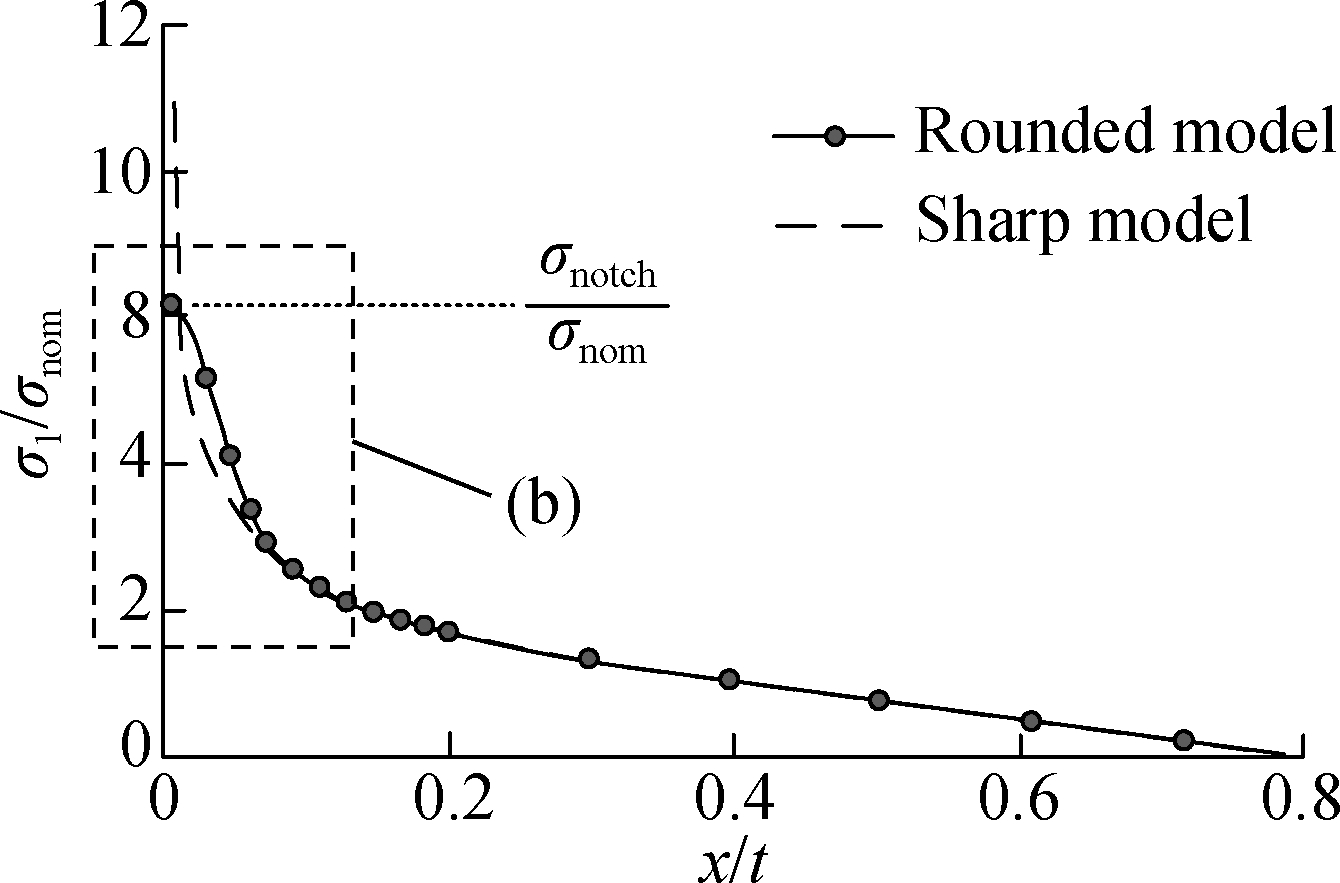
The stress field of the finite element model exhibits stress singularity at the vicinity of the weld toe or the weld root in welded structures. The irregular geometry of the weld seam and the microscopic defects within the weld seam lead to the notch effect at the weld toe or the weld root. According to the linear elastic theory of the material, the calculated notch stress at the weld toe or the weld root approaches infinity. However, materials at the local weld toe or the weld root exhibit obvious anisotropy properties, thus directly constraining and reducing the local peak stress at the weld toe or the weld root.Therefore, the notch stress solved by the notch stress field equation does not represent the actual stress state at the weld location. Sonsino et al.[22] proposed the effective notch stress parameter to represent the actual stress state at the notch location (weld toe or weld root). The peak stress of the original notch location was weakened by increasing the notch radius. Therefore, a rounded model with an amplified radius at the notch location can portray the actual stress state at the weld toe or the weld root, and is applied to analyze the fatigue behaviors of welded structures. Pradana et al.[24] proposed a new way, i.e. the extrapolation notch stress method, to determine the effective notch stress with the sharp model. Fig.1 shows the basic theory of this new method.
(a)

(b)Fig.1 Notch stress distribution at the weld toe[27]. (a) Stress distribution of the rounded model and the sharp model; (b) A partially enlarged view of (a)
The idea of the extrapolation notch stress method[24]comes from the comparison between the stress field of the presence of the virtual notch radius (rref=1 mm) and that of the absence of the virtual notch radius (rref=0 mm). Two finite element models[27] (the rounded model and sharp model) with identical geometric dimensions, load conditions, and element mesh sizes were created, and the difference is that the rounded model includes a virtual notch radius (rref=1 mm) at the weld toe, and the sharp model is not (rref=0 mm). It is shown in Fig.1 that the stress of the sharp model at the weld toe (rref=0 mm) is infinite and not convergent; on the contrary, the stress of the rounded model corresponding to the effective notch stress method approaches a constant maximum value at the weld toe (rref=1 mm). It can be seen from Fig.1(a) that, outside the distance of 0.2t (t is the thickness of the steel pipe) from the weld toe, the curves of the maximum principal stress (here the maximum principal stress was normalized by the nominal stress) calculated using the rounded model and the sharp model coincide with each other and maintain a linear relationship with the distance from the weld toe. It can be seen from Fig.1(b) that, in the double logarithmic coordinate system, the stress of the sharp model is still linear with the distance from 0.04t to 0.2t. Then, the linear curve part is extrapolated to the weld toe direction and intersects with the stress curve of the rounded model at the extrapolation point C. Since the effective notch stress calculated by the rounded model tends to be constant near the weld toe, it can be seen from Fig.1(b) that the extrapolation point C is located precisely in the stable region of the stress curve of the rounded model. When parameter C is obtained, the effective notch stress of the rounded model at the weld toe can be derived from the stress curve of the sharp model at location C. Pradana et al.[24,26] verified that the stress curve of the rounded model and that of the sharp model intersect within the distance of 0.02t from the weld toe, so in this paper, the study of the welded CSJ finite element model focuses on the stress field within the distance of 0.02t from the weld toe and the weld root.
1.2 Calculation steps
As shown in Fig.1(b), it is indicated that the linear part of the stress field of the rounded model and that of the sharp model are on top of each other from 0.04t to 0.2t, so the linear part of the curve can be expressed as
logm=a+blogn
(1)
Let m=σ1 /σnom, n=x/t, where σ1 is the maximal principal stress, and σnom is the nominal stress. Then, substituting m, n into Eq.(1), we derive
(2)
Removing the logarithmic symbol on both sides of Eq.(2), we obtain[24]
![]() =10a(x/t)b=A(x/t)B
=10a(x/t)b=A(x/t)B
(3)
![]() =A(C)B
=A(C)B
(4)
where A and B are the coefficients, and the nominal stress[24] σnom is the stress resulting from the applied external load, which ignores the effect of the local notch effect. Setting x/t=C and substituting it into Eq.(3), the effective notch stress σnotch at the weld toe can be obtained by Eq.(4)[24]. Parameter C is related to the structural geometric parameters and load modes. Let α, β, γ, ζ, η, etc. be the structural geometric parameters, and then C can be expressed as[24]
C=f(αβγζη)
(5)
To apply Eq.(4) for calculating the effective notch stress σnotch, the key problem is to determine coefficients A, B, and the extrapolation point C. The effective notch stress σnotch at the weld toe can be solved by the rounded model, and coefficients A, B can be defined by fitting the linear part (from 0.04t to 0.2t) of the stress curve of the sharp model, and then the value of C can be obtained by the inverse analysis of Eq.(4). By setting different geometric parameter values, parameter C can be also calculated by Eq.(4), and then the relationship between C and the geometric parameters in Eq.(5) can be established by fitting. It should be noted that the extrapolation notch stress method is different from the effective notch stress method, and it is necessary to verify the mesh sensitivity problem of the finite element model when performing the effective notch stress calculation through the extrapolation notch stress method.
2 Application of the Extrapolation Notch Stress Method in Welded Cast Steel Joints
2.1 Mesh size definition
A typical welded cast steel joint[6-7] is shown in Fig.2, which consists of a cast steel pipe, backing plate, weld seam, and connecting steel pipe. The elastic modulus E1 and Poisson’s ratio of cast steel material are equal to 211 GPa and 0.29, respectively. The elastic modulus E2 of the steel pipe is 206 GPa, and Poisson’s ratio is 0.3. The mechanical properties of the backing plate are consistent with those of the steel pipe. A tension load F of 20 MPa is applied to the end of the connecting steel pipe of the welded cast steel joint shown in Fig.2(a), and the end of the cast steel pipe is fixed. As shown in Fig.3, the Solid 185 element is chosen to mesh the finite element model of the welded cast steel joint. The maximum principal stress (σ1) is selected for the stress analysis for both the rounded model and the shape model.

(a)

(b)Fig.2 A typical welded cast steel joint. (a) Boundary condition; (b) Geometry size (unit: mm)
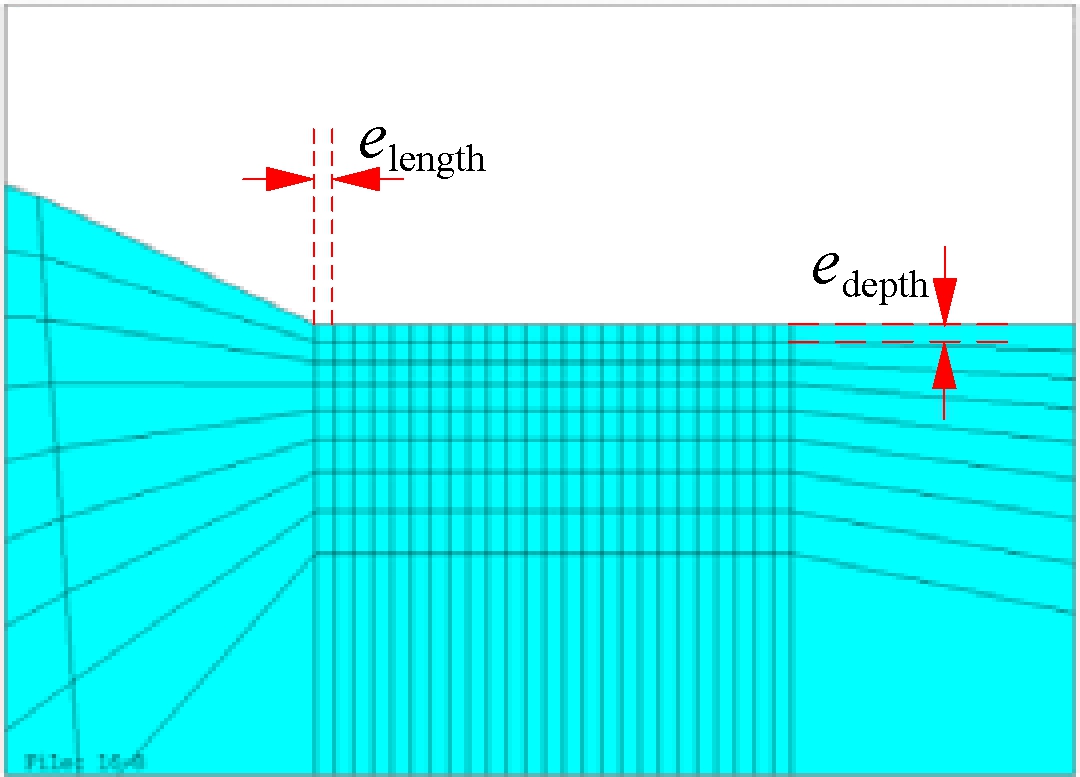
The optimal mesh size is determined by controlling variables. As shown in Fig.3(a), firstly, the length of the element (elength) is maintained at a constant value of 0.01t, and the thickness of the element is changed, and then its effect on the normalized max principal stress (σ1/σnom) distribution is studied. As shown in Fig.4, the stress within the distance of 0.25t from the weld toe is selected for the mesh sensitivity analysis of the depth of the element. It can be seen from Fig.4 that when edepth is less than or equal to 0.01t, the linear part of the normalized maximal principal stress curve of the sharp model coincides with that of the rounded model. Therefore,edepth takes the value of 0.01t in the following analysis.
(a)

(b)Fig.3 Mesh size of two kinds of models. (a) Sharp model; (b) Rounded model

Fig.4 Normalized stress corresponding to finite element models with elements of different thicknesses
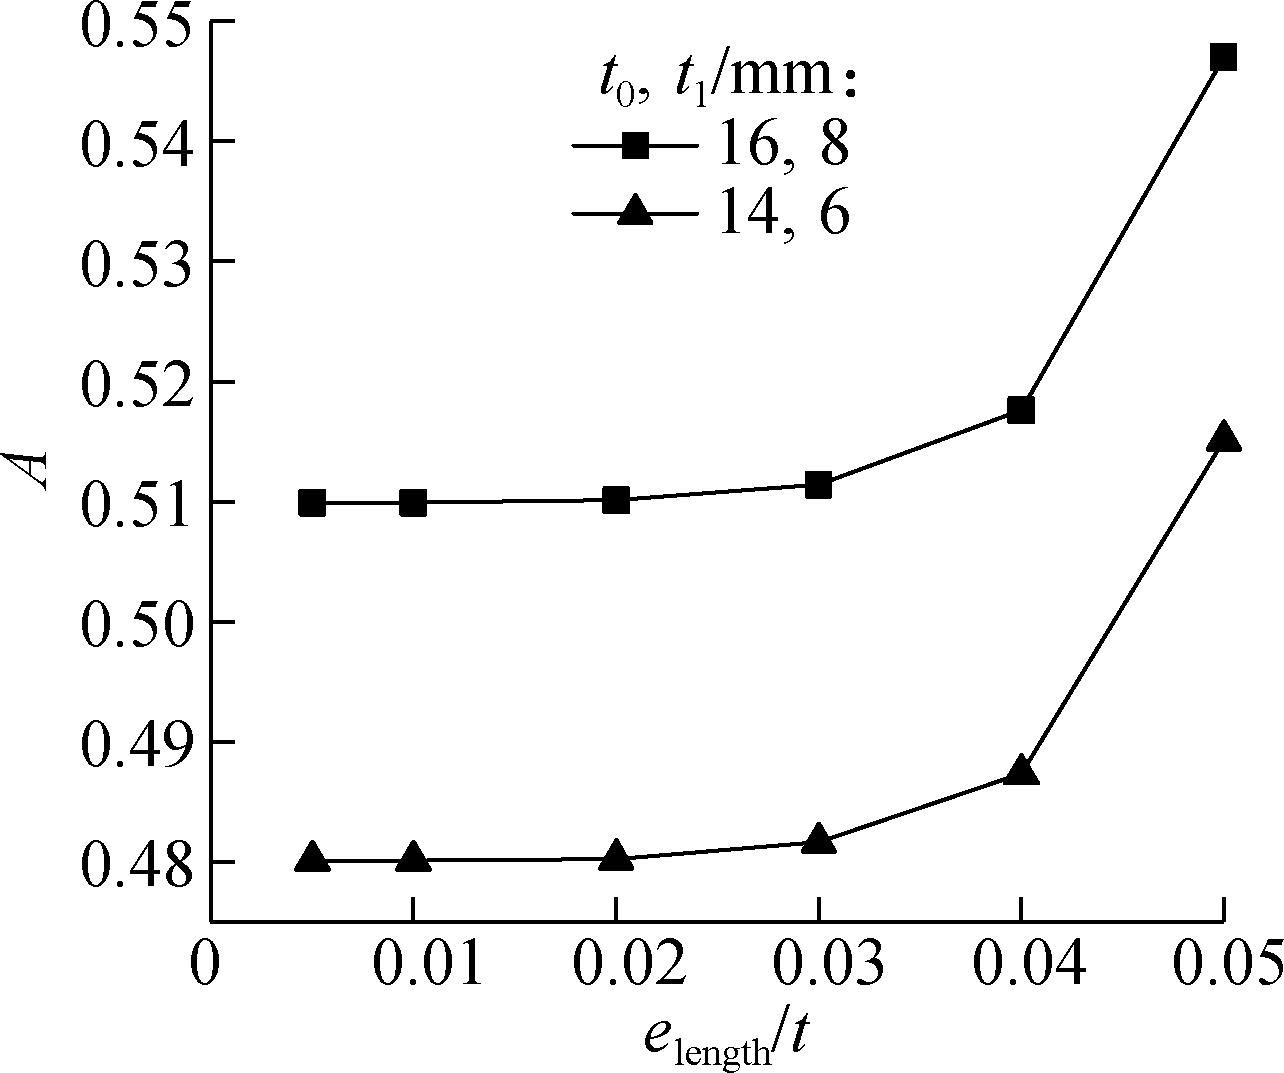
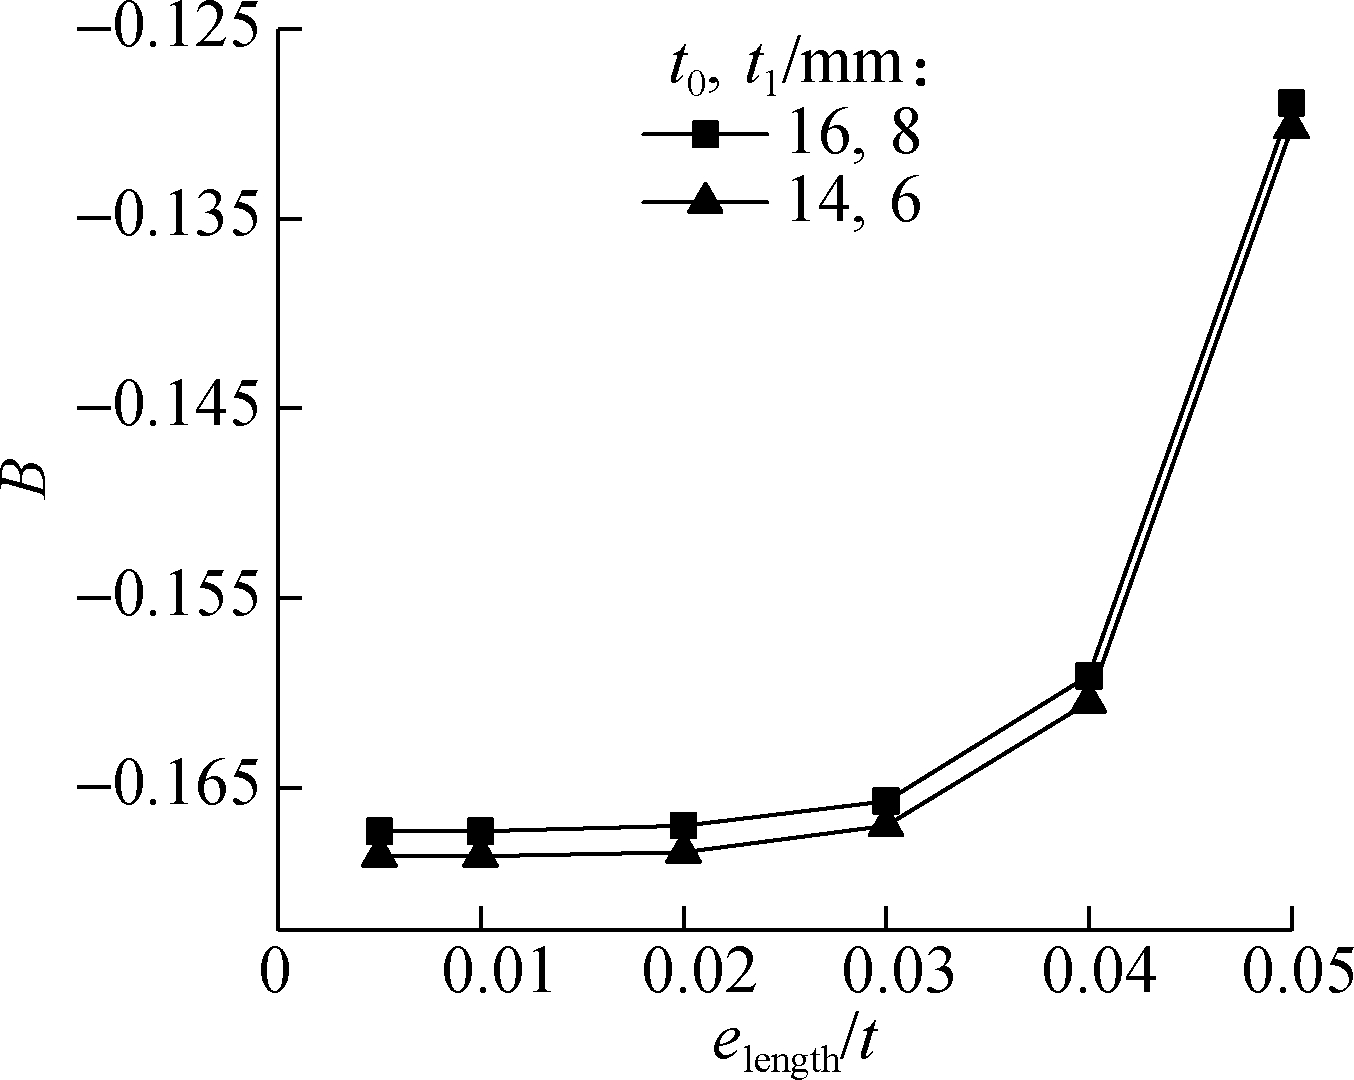
The element length elength can be determined by its influence on coefficients A, B, parameter C, and the effective notch stress. According to the sharp model, the normalized maximal principal stress of all nodes at the linear extrapolation zone (0.04t-0.2t) is logarithmically fitted to quantify coefficients a and b in Eq.(1), and then coefficients A and B can be obtained by Eq.(3). As the effective notch stress can be obtained by the rounded model, C can be calculated by Eq.(4).
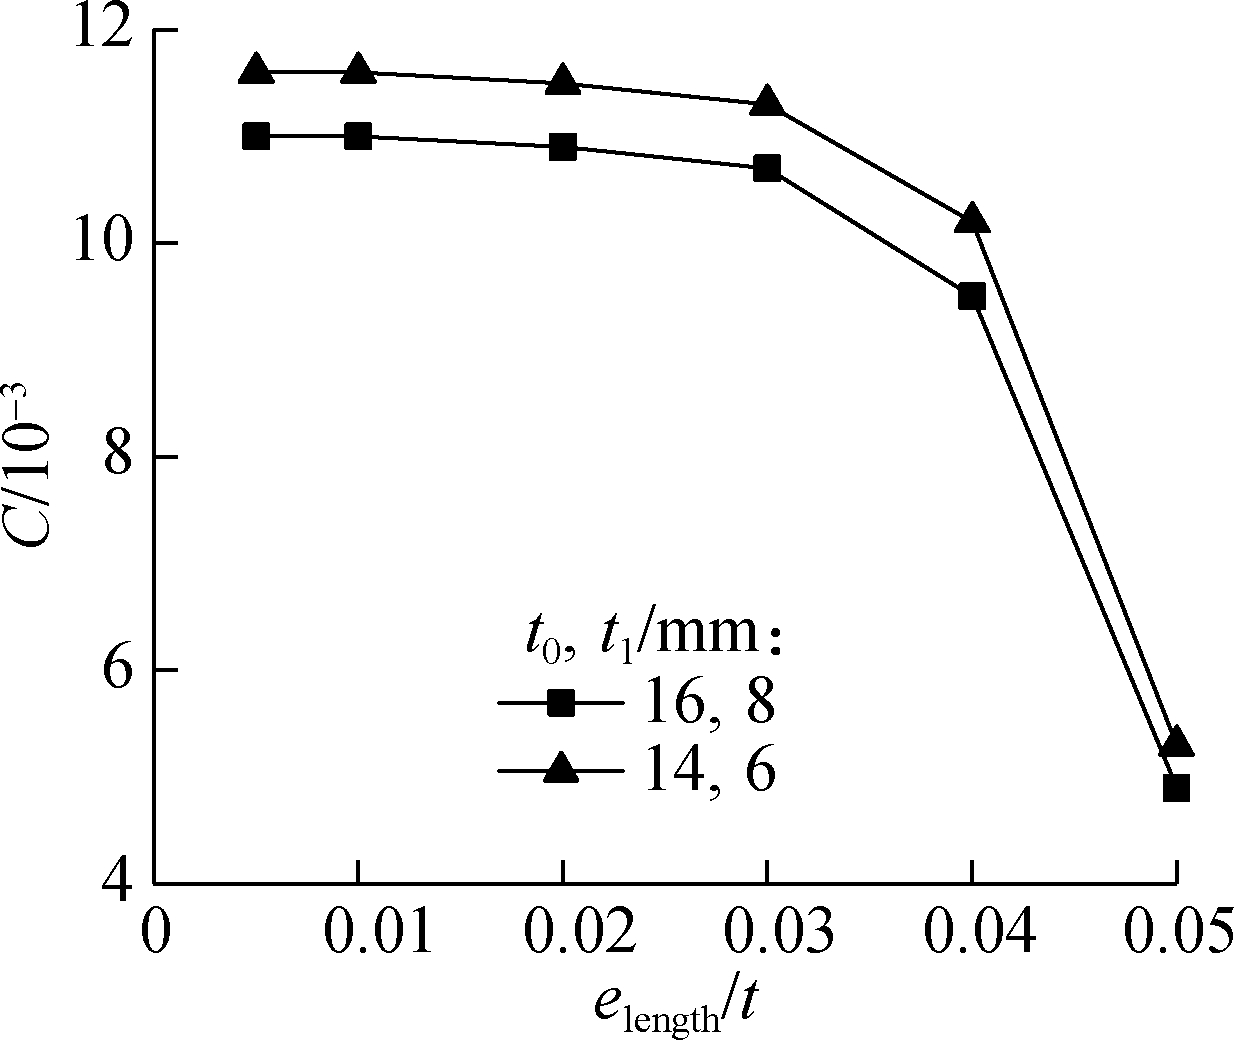
To simulate the actual geometry of the welded cast steel joint in engineering applications, the outer diameter of the welded cast steel joints(d) studied in this section is equal to 160 mm, and the thicknesses of the cast steel section (t0) are 16 and 14 mm, respectively. The thicknesses of the steel pipe (t1) are 8 and 6 mm, respectively. The element length elength is increased from 0.005t to 0.05t, and the result is shown in Fig.5. As can be seen from Figs.5(a) to (c), the smaller the element length, the more the parameters A, B, C tend to be constant. As can be seen from Fig.5(d), there is almost no correlation between the normalized effective notch stress and the element length elength. For computational efficiency, elength should not be too small. Therefore, it is set to be 0.01t in the following analysis.
(a)
(b)
(c)

(d)
Fig.5 The influence of elength. (a) The influence of elength on coefficient A; (b) The influence of elength on coefficient B; (c) The influence of elength on parameter C; (d) The influence of elength on effective notch stress
2.2 Calculation of effective notch stress at the weld toe
Tab.1 lists the main geometric parameters of the welded cast steel joint, including the thickness of the cast steel pipe t0, the thickness of the connecting steel pipe t1, the outer diameter of the connecting steel pipe and the cast steel pipe d. For convenience, t0, t1, d are replaced by α (t0/tref), β (t1/tref), γ (d/(2t1)), respectively, where tref is the reference thickness.
Tab.1 Geometry parameters of welded cast steel joint for calculating effective notch stress at the weld toe

ParametersValues t0 mm 10 12 13 14 15 16 18 20 t1 mm 5 6 7 8 9 10 11 d 2t1 12 15 18 21 25 tref mm 10
As mentioned in Eq.(5), the following equation is used as the functional relationship between the value of extrapolation point C and geometric parameters α, β, γ:
C=λ(α)X1(β)X2(γ)X3
(6)
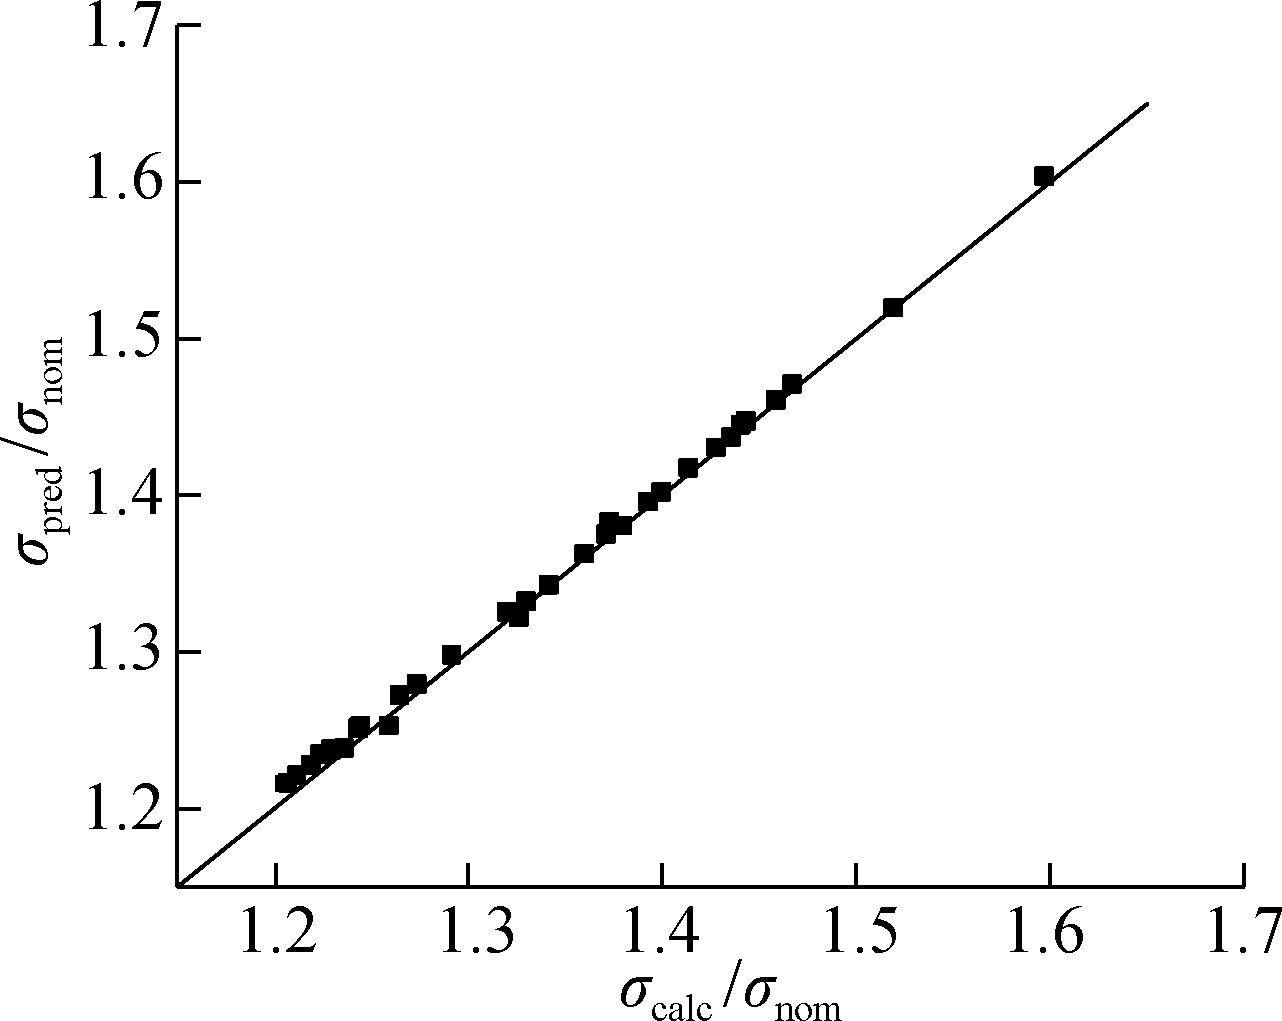
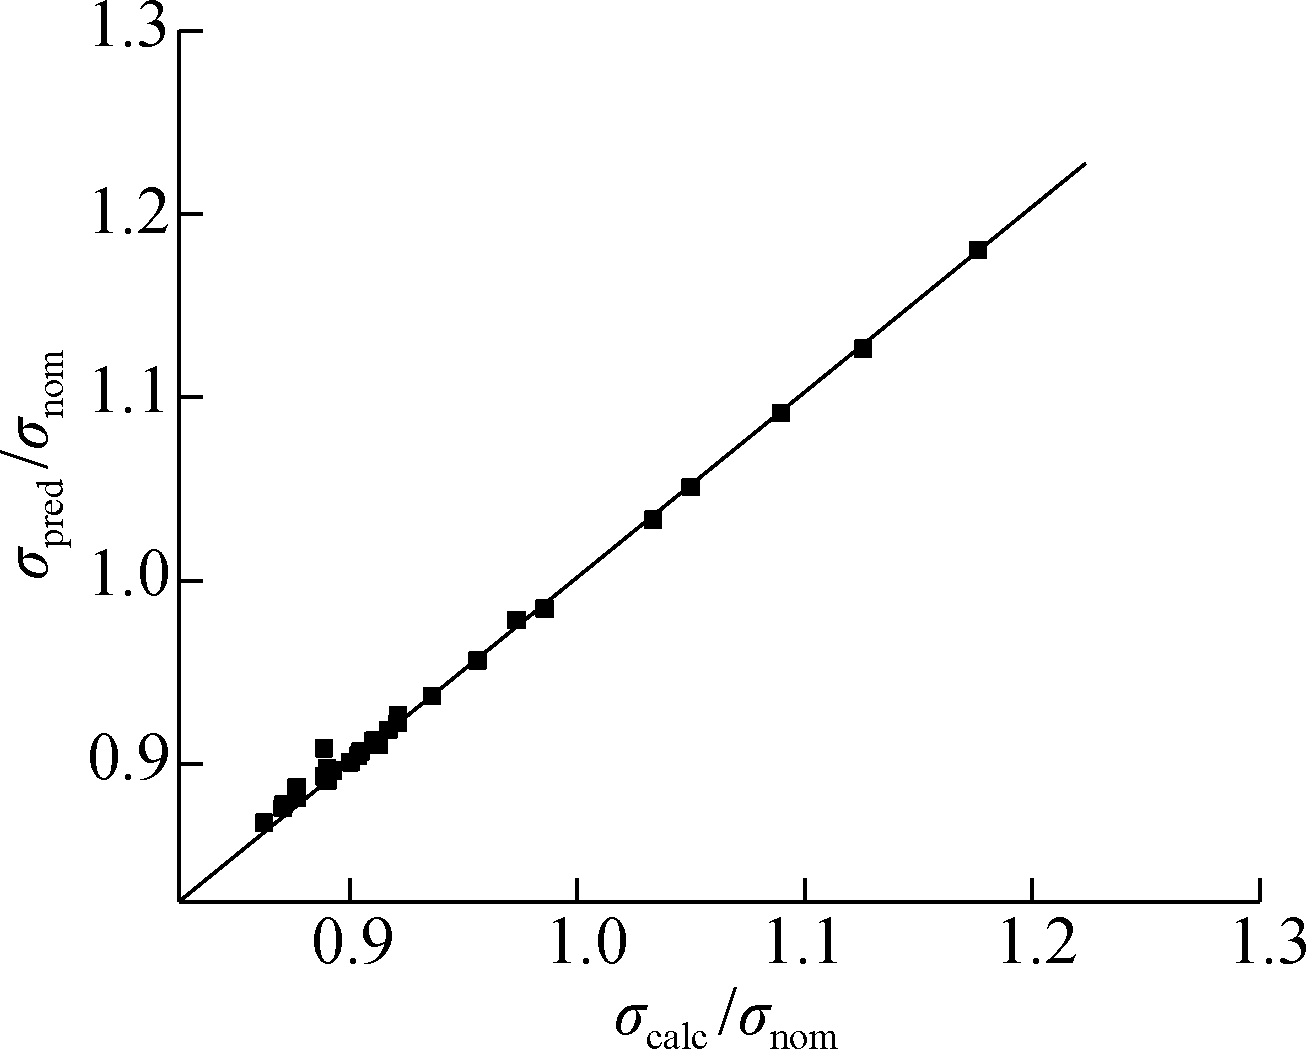
where λ, X1, X2, and X3 are the coefficients. By the multiple linear regression analysis performed using Matlab software, the coefficients λ, X1, X2, and X3, and the correlation coefficient R2 can be obtained, which are shown in Tab.2. The predicted effective notch stresses (σpred) calculated by Eq.(4) and Eq.(6) and the effective notch stresses (σcalc) calculated by the rounded model of the effective notch stress method under remote tension and remote bending are shown in Fig.6. It can be seen from Fig.6 that the ratio of the above two effective notch stresses is linear and proportional, and the error between the predicted value (σpred) and the actual value (σcalc) is small. It is verified that the extrapolation notch stress method can be applied to calculate the effective notch stress at the weld toe of welded cast steel joints.
Tab.2 Parameters of Eq.(6) and correlation coefficient R2 at the weld toe

Load modesλ 10-3X1X2X3R2Remote tension5 2550 043 1-1 337 20 053 70 999 7Remote bending4 4520 033 2-1 368 20 073 30 998 3
2.3 Calculation of effective notch stress at the weld root
Tab.3 lists the main geometric parameters of the welded cast steel joint. The calculation of the effective notch stress at the weld root is similar to that at the weld toe.
(a)
(b)
Fig.6 Comparison of the effective notch stress calculated by two methods at the weld toe. (a) Remote tension load; (b) Remote bending load
Tab.3 Geometry parameters of welded cast steel joint for calculating effective notch stress at the weld root

ParametersValues t0 mm 16 18 20 21 22 25 26 30 t1 mm 8 10 12 14 16 20 d 2t1 10 12 15 18 20 25 30 tref mm 10
The multiple linear regression analysis is performed using Matlab software to obtain the coefficients of Eq.(6) and the correlation coefficient R2, which are shown in Tab.4.The effective notch stresses σpred predicted by the extrapolation notch stress method and the effective notch stresses σcalc calculated by the effective notch stress method under remote tension load are shown in Fig.7.The result of Fig.7 indicates that the relative error of the effective notch stresses calculated by the two methods at the weld root is greater than that at the weld toe due to the large stress concentration at the weld root but the stress ratio is still around 1.The extrapolation notch stress method can still be applied to calculate the effective notch stress at the weld root of the welded CSJ within a certain allowable error.
Tab.4 Parameters of Eq.(6) and correlation coefficient R2atthe weld root

3 Fatigue Life Evaluation of the Welded Cast Steel Joint

Fig.7 Comparison of effective notch stresses of two methods at the weld root under the remote tension load
The fatigue life evaluation accuracy of the extrapolation notch stress method and effective notch stress method is compared in this section. For steel welded structures,the IIW[28]recommended FAT225 curve as the designed S-N curve for the fatigue life evaluation based on the effective notch stress parameter Δσe. The inverse slope m of the curve is equal to 3, and the S-N curve is shown as
logN=13.558-3logΔσe
(7)
According to the welded cast steel joints applied in practical engineering cases, the fatigue life evaluation of four typical geometric sizes of the welded cast steel joints at girth butt weld shown in Fig.2 is carried out. The results are listed in Tab.5, and it can be seen from Tab.5 that the fatigue life predicted by the extrapolation notch stress method is very close to that by the effective notch stress method, and the maximum relative error is 4.4%. The effective notch stress range-fatigue life curves of the effective notch stress method and the extrapolation notch stress method are shown in Fig.8. It can be seen that the fatigue life of welded cast steel joints predicted by these two methods is nearly the same. The fatigue life evaluation by the extrapolation notch stress method is more conservative than that by the effective notch stress method, so the extrapolation notch stress method is also safe for the fatigue design of welded cast steel joints.
Tab.5 Fatigue life predicted by the effective notch stress method and extrapolation notch stress method

t0 mmt1 mmEffective notch stress MPaFatigue life NCalculationExtrapolationEffective notchstress methodExtrapolation notchstress method1610174 204176 8246 836 3706 536 9632012231 906230 8852 897 7702 936 3852212382 415381 632646 242650 228258451 785456 060391 926381 008Note d 2t1 =15
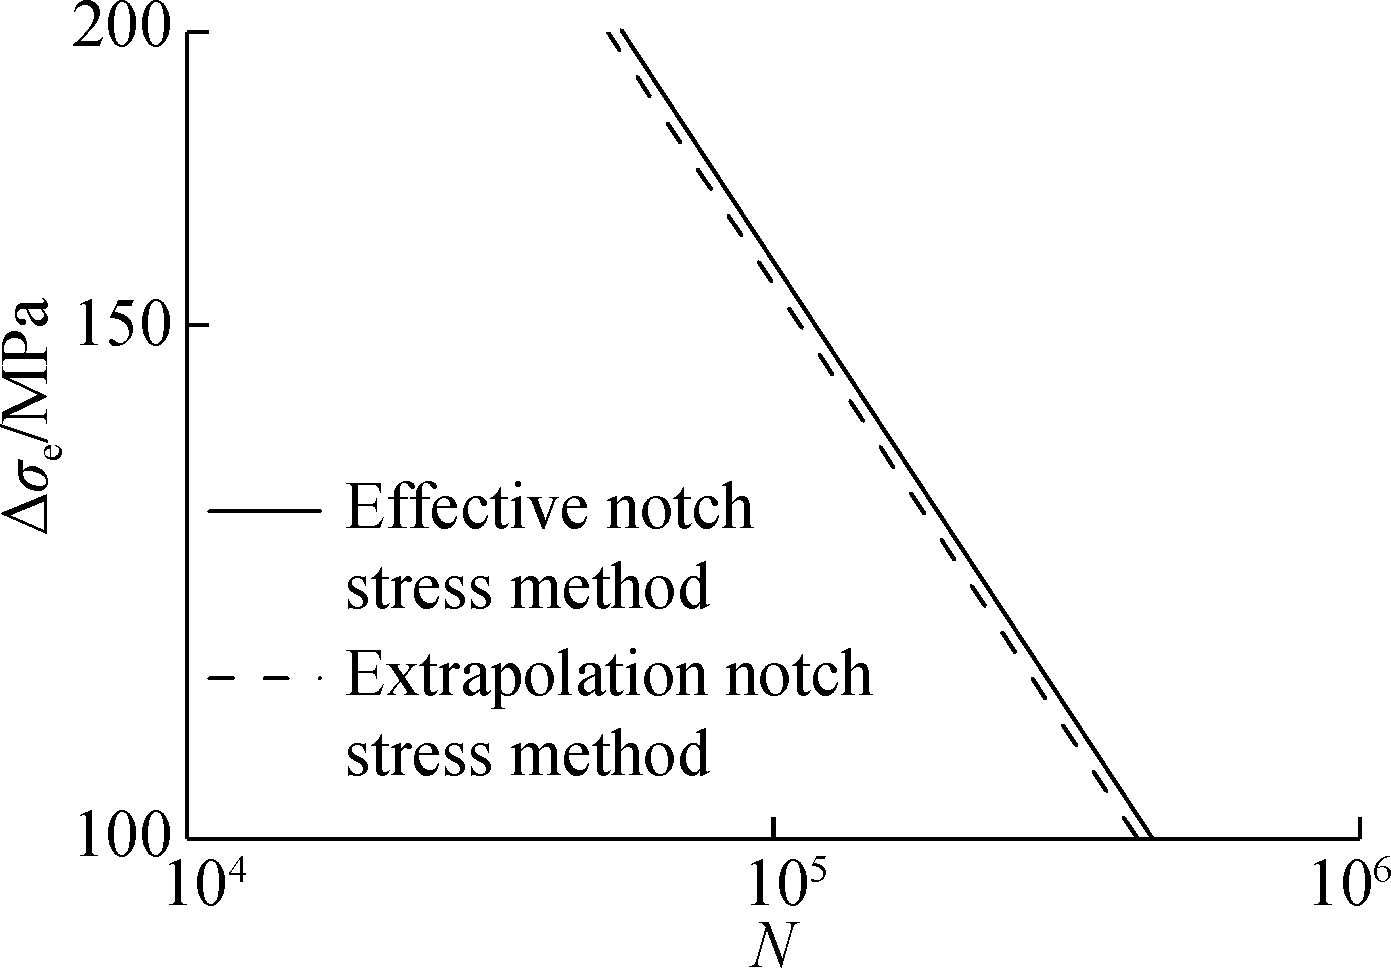
Fig.8 S-N curves of the two methods
4 Conclusions
1) When the extrapolation notch stress method is applied to calculate the effective notch stress at the weld toe or the weld root of welded cast steel joints, the length, and thickness of the element in the finite element model should be set to be 0.01t or less near the weld toe or the weld root, and the extrapolation zone should be 0.04t-0.2t. The extrapolation notch stress method has shown greater improvement in modeling convenience and computational efficiency than that of the effective notch stress method.
2) The geometry parameters t0, t1, and d of the welded cast steel joint are the main factors affecting the effective notch stress at the weld toe or the weld root under remote tension and remote bending load conditions. The extrapolation point C is the most relevant to the thickness of the steel pipe. The effective notch stress calculated by the extrapolation notch stress method is consistent with that calculated by the effective notch stress method.
3) The fatigue life predicted by the extrapolation notch stress method is very close to that calculated by the effective notch stress method, and the extrapolation notch stress method is more conservative than the effective notch stress method, so it is safer for the fatigue design of welded cast steel joints.
[1] Haldimann-Sturm S C, Nussbaumer A. Fatigue design of cast steel nodes in tubular bridge structures[J]. International Journal of Fatigue, 2008, 30(3): 528-537. DOI: 10.1016/j.ijfatigue.2007.03.007.
[2] Zhao X L, Tong L W. New development in steel tubular joints[J].Advances in Structural Engineering, 2011, 14(4): 699-715. DOI:10.1260/1369-4332.14.4.699.
[3] Jin H, Mo J H, Sun S J, et al. Experimental study on medium and low cycle fatigue properties of cast steel GS20Mn5V[J]. Journal of Shanghai Jiaotong University (Science), 2020: 1-9. DOI:10.1007/s12204-020-2237-5.
[4] Xia J, Jin H. Analysis of residual stresses and variation mechanism in dissimilar girth welded joints between tubular structures and steel castings[J]. International Journal of Pressure Vessels and Piping, 2018, 165: 104-113. DOI:10.1016/j.ijpvp.2018.06.003.
[5] Yan H D, Jin H. Damage evolution analysis of cast steel GS-20Mn5V based on modified GTN model[J]. Journal of Southeast University (English Edition), 2018, 34(3): 364-370. DOI: 10.3969/j.issn.1003-7985.2018.03.012.
[6] Wei Z Z, Jin H, Pei X J, et al. A simplified approach to estimate the fatigue life of full-scale welded cast steel thin-walled tubular structures[J].Thin-Walled Structures, 2021, 160: 107348. DOI:10.1016/j.tws.2020.107348.
[7] Wei Z Z, Jin H, Chen G L. Traction structural stress analysis of fatigue behaviors of girth butt weld within welded cast steel joints[J].International Journal of Pressure Vessels and Piping, 2020, 179: 104027. DOI:10.1016/j.ijpvp.2019.104027.
[8] Cai J G, Feng J, Gu H B, et al. Practical application and analysis of complex cast-steel joint[J]. Steel Construction, 2008, 23(4): 13-17. (in Chinese)
[9] Wang L, Jin H, Dong H, et al. Balance fatigue design of cast steel nodes in tubular steel structures[J].The Scientific World Journal, 2013, 2013: 421410. DOI:10.1155/2013/421410.
[10] Ding J M, Li B N, Chen J, et al. Design and application of large-scale cast-steel joints for special-shape bridges[J]. Transportation Research Record: Journal of the Transportation Research Board, 2010, 2172(1): 66-73. DOI:10.3141/2172-08.
[11] Du W F, Sun Y, Yang M J. Bearing capacity of the cast-steel joint with branches under eccentric load[J]. Journal of Constructional Steel Research, 2017, 135: 285-291. DOI:10.1016/j.jcsr.2017.04.005.
[12] Veselcic M, Herion S, Puthli R. Selection of butt-welded connections for joints between tubulars and cast steel nodes under fatigue loading[M]//Tubular Structures Ⅺ. New York: Routledge, 2017: 585-592. DOI:10.1201/9780203734964-72.
[13] Dong P. A structural stress definition and numerical implementation for fatigue analysis of welded joints[J].International Journal of Fatigue, 2001, 23(10): 865-876. DOI:10.1016/S0142-1123(01)00055-X.
[14] Dong P, Pei X, Xing S, et al. A structural strain method for low-cycle fatigue evaluation of welded components[J].International Journal of Pressure Vessels and Piping, 2014, 119: 39-51. DOI:10.1016/j.ijpvp.2014.03.003.
[15] Pei X J, Dong P S. An analytically formulated structural strain method for fatigue evaluation of welded components incorporating nonlinear hardening effects[J].Fatigue & Fracture of Engineering Materials & Structures, 2019, 42(1): 239-255. DOI:10.1111/ffe.12900.
[16] Pei X J, Dong P S, Xing S Z. A structural strain parameter for a unified treatment of fatigue behaviors of welded components[J].International Journal of Fatigue, 2019, 124: 444-460. DOI:10.1016/j.ijfatigue.2019.03.010.
[17] Wang P, Pei X J, Dong P S, et al. Analysis of weld root fatigue cracking in load-carrying high-strength aluminum alloy cruciform joints[J].International Journal of Fatigue, 2020, 139: 105735. DOI:10.1016/j.ijfatigue.2020.105735.
[18] Pei X J, Dong P S, Mei J F. The effects of kinematic hardening on thermal ratcheting and Bree diagram boundaries[J]. Thin-Walled Structures, 2021, 159: 107235. DOI:10.1016/j.tws.2020.107235.
[19] Pei X J, Dong P S. A universal approach to ratcheting problems of bree type incorporating arbitrary loading and material nonlinearity conditions[J]. International Journal of Pressure Vessels and Piping, 2020, 185: 104137. DOI:10.1016/j.ijpvp.2020.104137.
[20] Han Q, Guo Q, Yin Y, et al. Fatigue performance of butt welds between cast steel joint and steel tubular members[J].Fatigue & Fracture of Engineering Materials & Structures, 2017, 40(4): 642-651. DOI:10.1111/ffe.12513.
[21] Jin H, Li J, Mo J H, et al. Fatigue of girth butt weld for cast steel node connection in tower structure under wave loadings[J]. The Structural Design of Tall and Special Buildings, 2014, 23(15): 1119-1140. DOI:10.1002/tal.1111.
[22] Sonsino C M, Fricke W, de Bruyne F, et al. Notch stress concepts for the fatigue assessment of welded joints-background and applications[J]. International Journal of Fatigue, 2012, 34(1): 2-16. DOI:10.1016/j.ijfatigue.2010.04.011.
[23] Poutiainen I, Tanskanen P, Marquis G. Finite element methods for structural hot spot stress determination—a comparison of procedures[J]. International Journal of Fatigue, 2004, 26(11): 1147-1157. DOI:10.1016/j.ijfatigue.2004.04.003.
[24] Pradana M R, Qian X, Swaddiwudhipong S. An extrapolation method to determine the effective notch stress in welded joints[J]. Fatigue & Fracture of Engineering Materials & Structures, 2015, 38(9): 1118-1135. DOI:10.1111/ffe.12307.
[25] Fricke W, Kahl A. Comparison of different structural stress approaches for fatigue assessment of welded ship structures[J]. Marine Structures, 2005, 18(7/8): 473-488. DOI:10.1016/j.marstruc.2006.02.001.
[26] Pradana M R, Qian X, Swaddiwudhipong S, et al. An extrapolation method to determine the effective notch stress in circular hollow section X-joints[J]. Fatigue & Fracture of Engineering Materials & Structures, 2017, 40(2): 160-175. DOI:10.1111/ffe.12476.
[27] Pradana M R, Qian X D, Swaddiwudhipong S. Simplified effective notch stress calculation for non-overlapping circular hollow section K-joints[J]. Marine Structures, 2017, 55: 1-16. DOI:10.1016/j.marstruc.2017.04.006.
[28] Fricke W. Guideline for the fatigue assessment by notch stress analysis for welded structures[R]. Genoa, Italy: International Institute of Welding, 2008.